SENSOR INSTALLATION KIT
Your installation kit includes the following:
- Alta low temperature sensor
- 2 AA batteries
- Screws for the sensor case
- Glass bead vial
- Mounting clip
- Heavy-duty disc magnet
Note: You will need a Philips head screwdriver for the installation process.
INSTALL A SENSOR
- Install your sensor upon receipt of your installation kit!
- Remove the sensor cover and insert (2) AA batteries. Reattach the cover with the screws provided. (Note: Do not insert the batteries in advance. Wait until you are ready to place the sensor in your freezer.)
- Remove the adhesive peel from the Velcro strip on the back of the sensor. Place the sensor on the (hinge) side of the freezer as high as possible with the antenna pointing toward the ceiling.
- Identify the location where you will place the sensor in your freezer. Recommended location is the top shelf on the hinge side of the freezer. Remove the specimen tray and clear the area of excess frost.
- Remove the red sticker from the glass bead vial. Partly uncoil the sensor lead and insert the probe into the vial. (Note: It’s easiest to turn the vial upside down in order to insert the probe. Be sure it’s fully inserted)
- Remove the adhesive peel from the mounting clip and attach the magnet. Please note that the magnets are very sensitive. Watch your fingers!
- Insert the glass bead vial into the mounting clip.
- Carefully thread the glass bead vial in mounting clip through the hinge side of the open freezer.
- Attach the magnet to the interior of the freezer as far back as possible.
- Replace the specimen tray and close the freezer door.
Click here to watch the sensor installation video.
MONITOR YOUR FREEZER
- Log in to iMonnit.com
- Enter your user name. In most instances, your user name is your UCSF email.
- Enter your password. Your account was configured with a default password of Monnit2020. You should update your password the first time you log in. If you’ve forgotten your password, select Forgot? to re-set it. Note: Do not create a trial account or user name through Monnit.com
- Complete two-factor authentication, when prompted. The system will remember your device for 90 days.
Explore how the iMonnit software works. Kindly review all information for your sensor(s) to ensure that it is configured as requested, including:
- Sensor name(s), location(s), equipment
- Naming convention is generally Lab/PI name, freezer name, equipment type, sensor location (building abbreviation and room #), sensor ID
- Name, email address, cell phone number, cell carrier for each user.
- Notification preference, e.g., email, text, both (both is the default)
- Notification triggers for escalation path
- Temperature threshold
- Sensor inactivity
- Low battery
- Escalation path for notifications
- Other
VIEW YOUR SENSORS IN iMONNIT
Once you log in to iMonnit.com, you will be able to view all sensors mapped to the specific network in which your sensors are located. This is your iMonnit neighborhood.
Below is the user’s home screen. The top half of the page indicates Notifications that have been sent. The bottom half of the page lists all Sensors on the network.
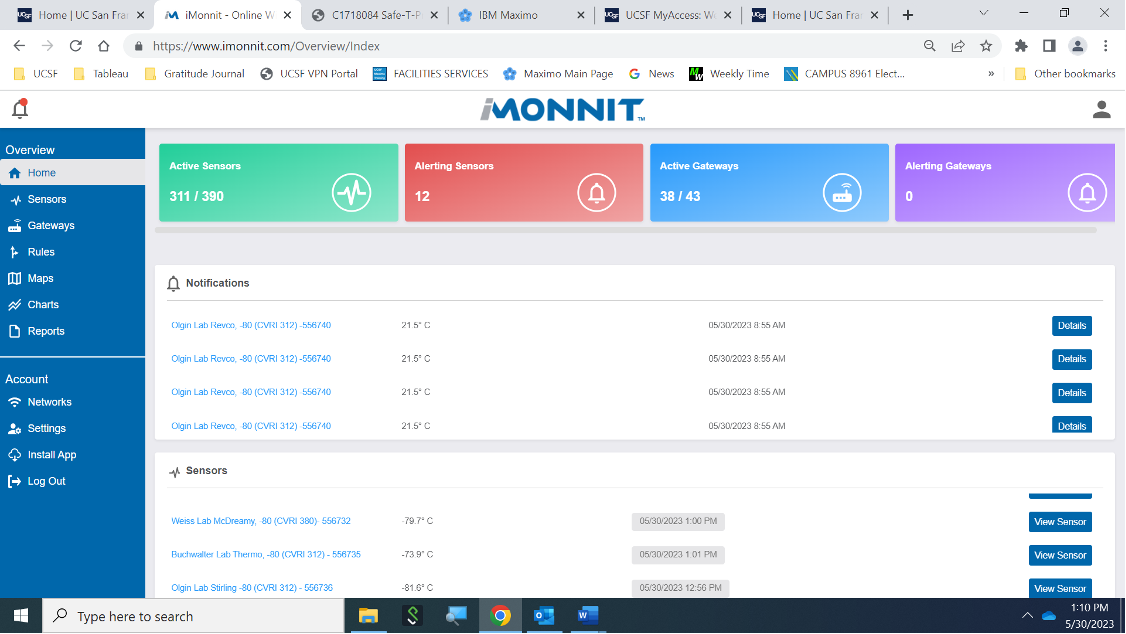
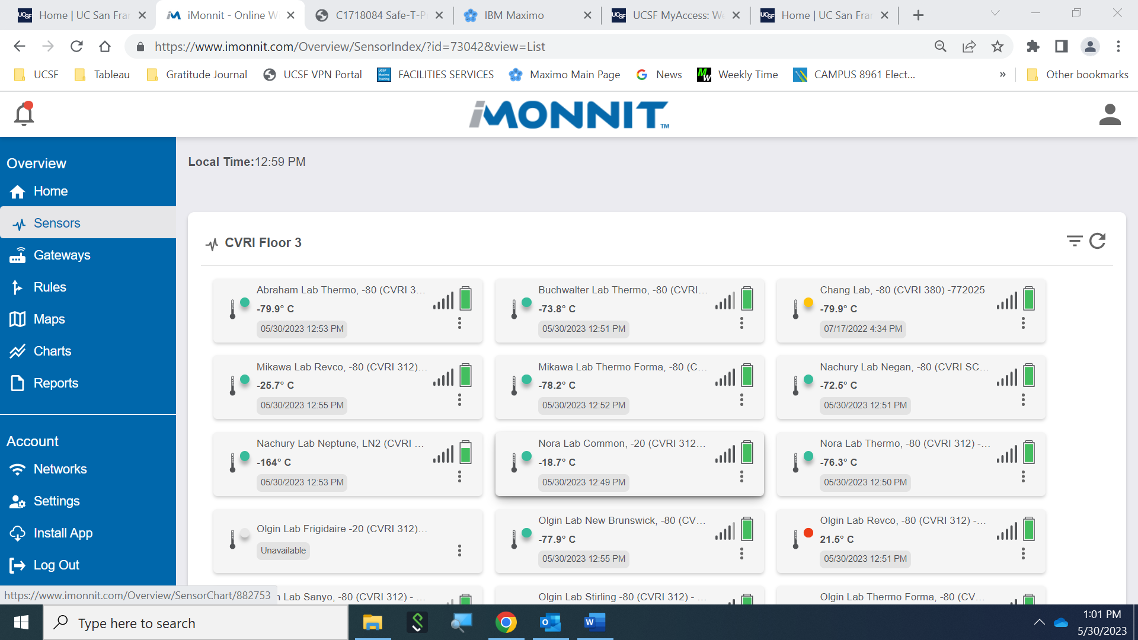
Note the categories on the left-hand navigation bar. Select Sensors. You will see all sensors mapped to the specific network. Below is CVRI Floor 3.
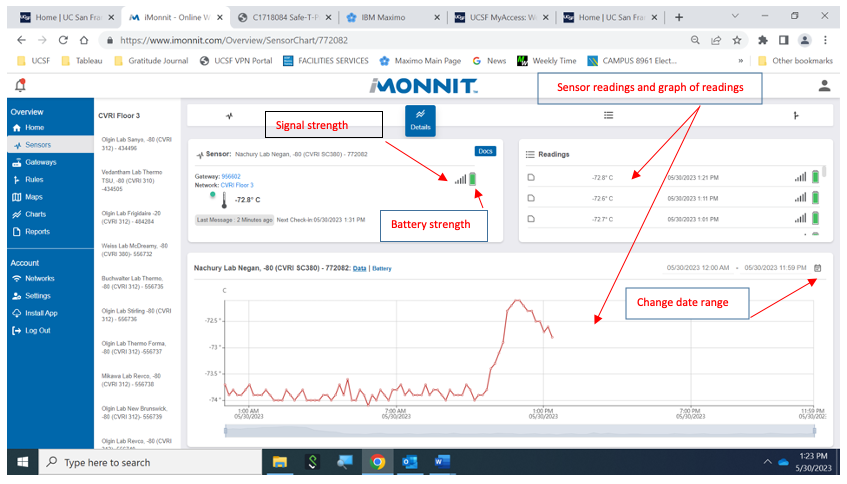
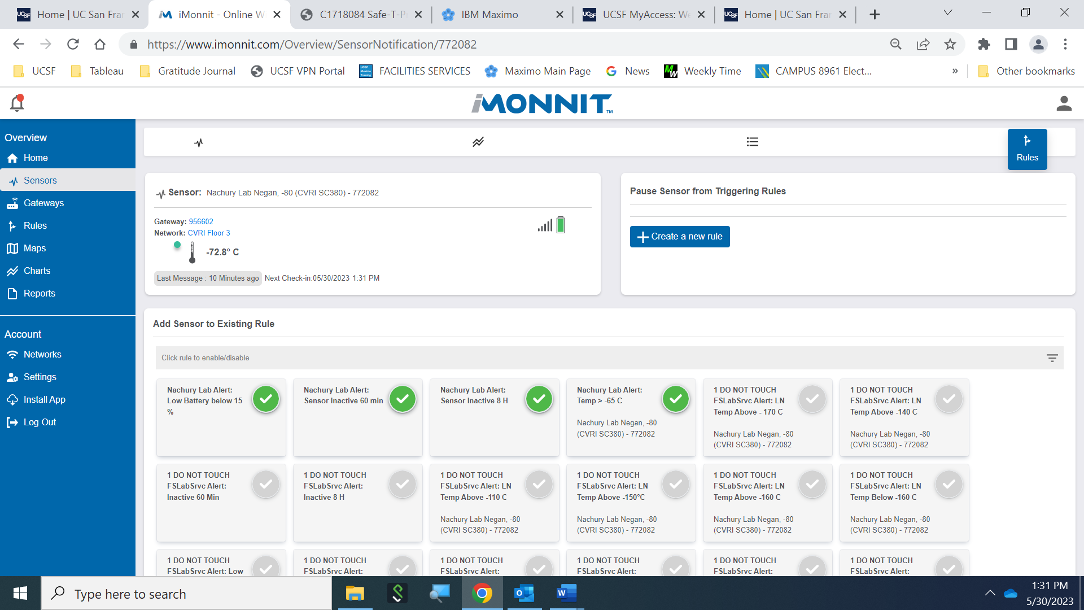
Verify your sensors to ensure that the names, locations, alerts, and escalation paths are correct. Let’s review Nachury Lab Negan, -80 (CVRI SC380) - 772082. In the Sensor box, note the signal strength and battery strength of your sensor. To the right, you will see dates and times of recent readings, with a graphical representation below. Use the calendar box to adjust the date range, as desired.
View the alerts configured for this sensor. Notification threshold: Temperature is > -65 C. Notify when battery is below 15%. Notify when sensor is inactive for 60 minutes. Notify when sensor is inactive for 8 hours.
FREQUENTLY ASKED QUESTIONS
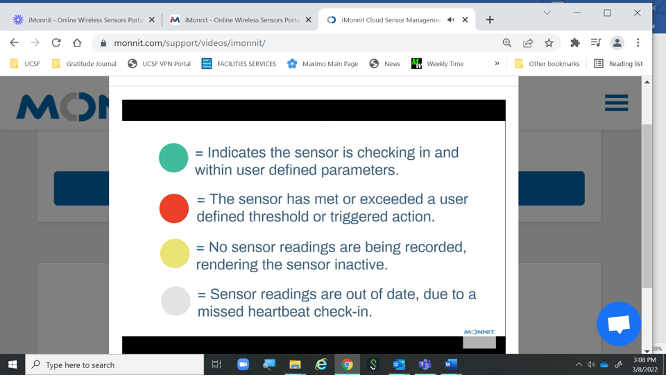
1. What do the colors mean?
2. What are the standard sensor alerts?
- Sensor is inactive for > 60 mins
- Sensor is inactive for > 8 hours
- Battery is < 15%
- Temperature notification threshold as specified by user
3. What is the standard escalation path?
N = triggering event, e.g., customer has requested an alert if sensor reads > -70 C and sensor is reading -69 C. When this occurs, the sensor enters into aware state.
- N + 30 mins = Notify first person in escalation path
- N + 45 mins = Notify second person in escalation path if person has not acknowledged the alert
- N + 60 mins = Notify third person in escalation path if neither the first nor the second person has acknowledged the alert
- N + 2 hours = Notify fourth person in escalation path if previous alerts have not been acknowledged
4. Can users be on the same point on the escalation path?
Yes. You can have multiple users receive notifications at the same escalation point.
5. How many users should be on the escalation path?
We recommend having a minimum of 2 users (preferably 3) in case someone is out sick or on vacation.
6. How do I add a user?
Please submit a work orderthrough the Customer Service Center and provide the following information.
- First and Last Name
- UCSF email
- Mobile Number
- Cell Carrier
- Name of sensor(s) to which you would like to add this person; e.g., Abraham Lab Thermo, -80 (CVRI 312) -556744
- The easiest solution is to include a screen grab of the sensor(s)
- Order in which you’d like this person to fall in the escalation path. If you’d like to substitute a new user for an existing user, please indicate that. We can take care of the addition and deletion at the same time.
- Note: Do not go to Monnit.com to sign up for a trial account or create a new user. This will prevent FS Research Support Services from adding you to the UCSF account and configuring your notifications.
7. How do I delete a user?
Please submit a work orderthrough the Customer Service Center and provide the following information.
- First and Last Name
- Lab(s) to which the user is affiliated
- See above regarding user substitutions.
8. How do I change the sensor escalation path?
Please submit a work orderthrough the Customer Service Center and provide the following information.
- Name of sensor(s)/sensor ID you would like to update, e.g., Abraham Lab Thermo, -80 (CVRI 312) -556744
- The easiest solution is to include a screen grab of the sensor(s)
- Please be specific in your request. It is difficult to process a request to “update all the sensors in the X Lab”
- Indicate the changes you would like to make
- For example, change notification threshold of Abraham Lab Thermo, -80 (CVRI 312) -556744 from >-60 C to >-70 C
- Again, screen grabs are the easiest way to submit change requests
9. Why am I able to see sensors associated with other labs?
You are able to see all sensors mapped to the same network as yours. These are sensors in neighboring labs. We follow a standardized naming convention for networks, gateways, and sensors so as to make it easier for you to view your sensors. (See section below.)
10. Our lab is getting a new freezer and we’re disposing of the old freezer? Can I just swap the sensor?
Please submit a work orderthrough the Customer Service Center and provide the following information.
- Name of sensor(s)/sensor ID you would like to update, e.g., Abraham Lab Thermo, -80 (CVRI 312) -556744
- The easiest solution is to include a screen grab of the sensor(s)
- We will send you an intake form to capture the information for the new freezer. We can re-name the sensor and make any notification changes at that time.
11. Our lab is getting another (incremental) freezer and we’d like to request a sensor for it.
Congratulation on your new freezer! We’d be glad to assist you with a new sensor.
- Please submit a work orderthrough the Customer Service Center
- Facilities Services will send you an intake form so that we may gather information about your equipment and who should be included in the notification process. We will prepare your sensor installation kit and send it by inter-office mail. Please be sure to verify your UCSF Box Number. If you are not certain of your UCSF Box Number, kindly contact UCSF Logistics for assistance.
12. I am defrosting my freezer. How do I pause notifications during this time?
Send an email to our team!
- Provide the sensor name/ID for the sensor you would like to pause, Abraham Lab Thermo, -80 (CVRI 312) -556744
- Indicate how long you’d like to pause alerts.
- When you’re ready to resume alerts, send us a request to the same email address.
13. The sensor reading displayed in iMonnit is different from the reading on the unit. Is it possible to calibrate the sensor?
Sensor readings in iMonnit may vary from those displayed on the face of the unit. Key reasons for differential readings are: 1) open/closed door activity; 2) how full or empty the unit is; 3) the placement of the sensor in the unit; and 4) freezer performance. For assistance with sensor calibration, please contact FS Research Support Services by text or phone so that this can be done in real time. The process is very fast.
14. Why can’t I just make the changes myself?
At present, iMonnit software does not support field-level security specific to your sensor. For this reason, changes need to be submitted to FS Research Support Services. Changes will be processed in a timely manner provided we have all specific details. (See above. Due to the volume of users and sensors, please submit a work order so that your request can be effectively processed.)
NAMING CONVENTIONS
1. What is the standard gateway naming convention?
- Gateways are mapped to sub accounts and networks
- Standardized gateway naming convention
- Building code, e.g., GH
- Location of gateway, e.g., N201
- Type of gateway, EGW4 or EGW3
- Gateway ID, e.g., 956631
EXAMPLE: GH N201 EGW4-956631
2. What is the standard sensor naming convention?
- Sensors are mapped to sub accounts and networks
- Standardized sensor naming convention
- Lab Name, e.g., Fisher Lab
- Freezer Name (or equipment name), e.g., Persephone II
- Freezer temp, e.g., -80
- Sensor ID, e.g., 956631
EXAMPLE: Fisher Lab Persephone II, -80 (IRM 904E)- 732213
TROUBLESHOOTING TIPS
IF THE GATEWAY IS OFFLINE
If a gateway goes offline for any reason, sensors will likely lose their connection to the network. In some instances, a network may have more than one gateway in which case the sensors will automatically try to point to the alternate gateway. Signal strength may vary, depending on proximity.
- Power-cycle the gateway
- Unplug the gateway ethernet cable
- Wait 60 seconds and plug the cable back into the port
- Turn the gateway so that you are viewing the left-hand side. You will see 3 lights on the right. These should begin to illuminate in sequence as the gateway power cycles. Ideally, all will turn green.
- If it is difficult to access the data port, there is another way to power cycle the gateway. To the left of the 3 lights, there is a button labeled Utility. Push the button using the end of a pen. This will trigger the same process.
- Monitor the sensors to ensure that they come back online.
- Contact our team if you need assistance with troubleshooting.
IF THE SENSOR IS OFFLINE
- Check the battery level to see if batteries need to be replaced. (An alert should have been sent to the escalation path users when the battery level reached 15%.)
- Remove the batteries; wait a full 60 seconds; then re-insert the batteries. (In most instances, a hard re-set of the sensor will restore connectivity.)
- Check the signal strength for the sensor. Things to consider:
- Has the freezer been moved?
- Did someone relocate the gateway?
- Is the freezer in a densely concrete area?
- Check to see if the sensor has shorted.
- Monitor the sensor to ensure it comes back online.
- Contact our team if you need assistance with troubleshooting.